
How to Tig Weld Aluminum Advanced Shapes
Turning TIG Practice Coupons into Geometry: An Origami-Inspired Welding Project
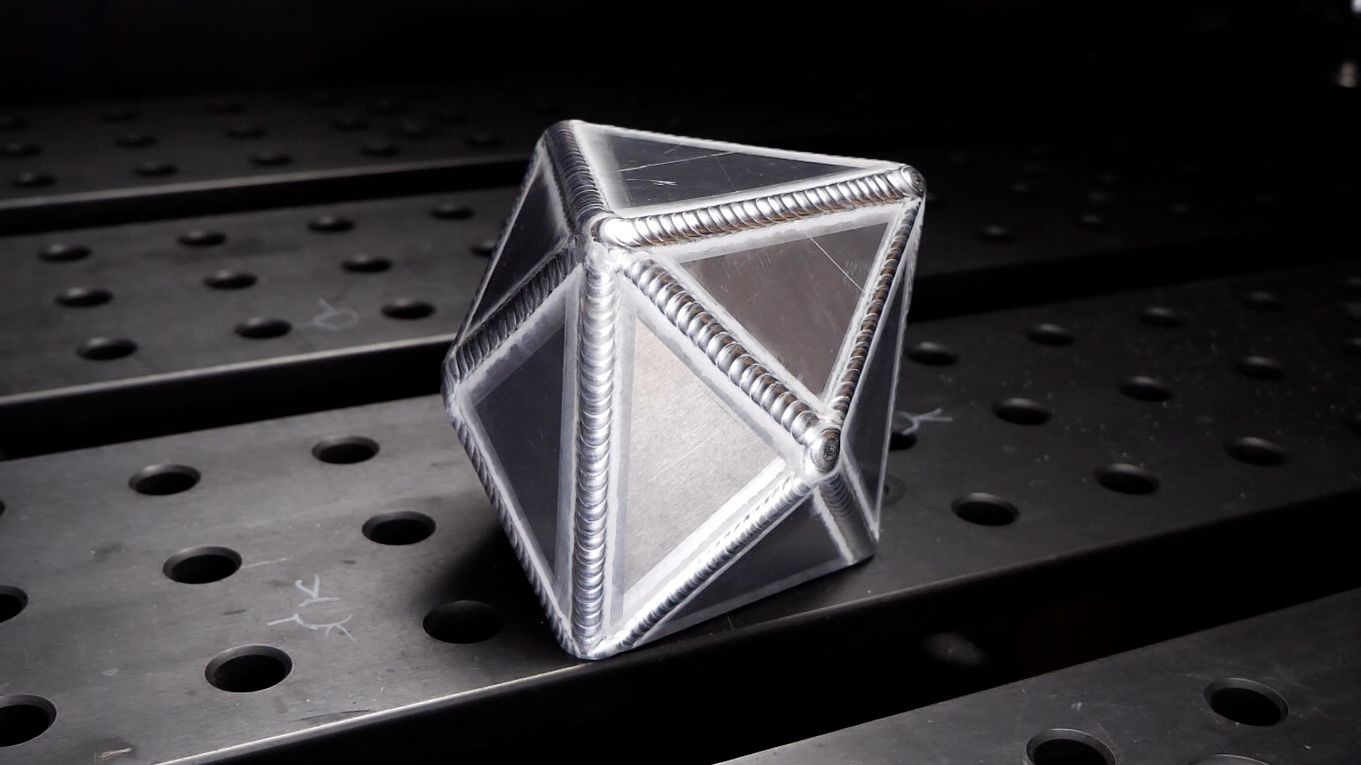
Most people use aluminum practice coupons to run beads, adjust settings, or test their hand-eye coordination. But what if you could turn those same coupons into a creative, precise, and visually striking TIG welding project?
That’s what this build was all about—taking basic 3x6" aluminum coupons and turning them into a clean, geometric shape inspired by origami.
It wasn’t just for fun (though it was fun). This project tested nearly every skill in my TIG welding toolkit: cutting accuracy, edge prep, fit-up, tacking, weld sequencing, and heat management.
Whether you're just starting your TIG welding journey or you've been laying beads for years, there’s something in this build that will sharpen your skills and unlock new creative potential.
Instead of walking you through each weld, let me break down the key lessons and tips that made this project possible—and how you can apply them to your own welding practice.
***This article follows along with a video lesson where I demonstrate each step along the way, and explain in more detail. Watch the lesson for free HERE.
6 Key Lessons from This Project
1. Creative Builds Make You a Better Welder
It's easy to get stuck running beads on flat bar forever. But if you really want to improve fast, put your skills to the test with something unconventional.
This origami-inspired shape wasn’t just cool to look at—it forced me to think like an engineer, a fabricator, and an artist. I had to measure carefully, plan every cut, and weld with absolute control. The result? A huge jump in my precision and awareness.
If you're bored with the same old practice joints, this is your sign to try something different.
2. Clean Cuts = Clean Welds
The entire shape started with one 3x6" aluminum coupon—cut into identical triangles using a bandsaw and belt sander. And here’s what I’ve learned after years of TIG welding:
“Your weld is only as good as your cut and prep.”
Bad cuts lead to gaps, gaps lead to over-welding, and over-welding leads to heat distortion, messiness, and wasted time. I recommend taking your time on the front end—measure, mark, and cut accurately. Then deburr and refine every edge with a fine-grit belt or file.
Your future self will thank you during weld out.
3. Edge Prep & Cleaning is Not Optional (Especially with Aluminum)
Aluminum is a different animal when it comes to prep. You can’t just wipe it down and go.
For this project, I did a full edge cleanup:
-
Sanded all cut edges smooth and flat
-
Decontaminated with acetone
-
Removed surface oxide with a stainless steel wire brush (and then decontaminate again.)
Why? Because aluminum oxide has a much higher melting point than the base metal—and if you skip prep, your arc will dance around like it’s drunk and your puddle will fight you the whole time.
Clean prep = stable arc = clean results.
4. Tape It First. Weld It Second.
Before any welding, I taped the entire piece together to check fit-up. It’s a simple trick, but it lets you:
-
Spot misalignments early
-
Make adjustments without burning rod
-
Avoid heat distortion before it starts
When things are taped and aligned perfectly, the tacking process becomes way smoother. I also numbered each piece to keep the triangle rotation consistent—especially useful when every seam looks the same but angles matter.
If you’ve ever gotten halfway through a weld and realized something’s twisted or out of square… you’ll never skip dry-fitting again.
***Just to be safe, after using tape or handling for dry-fit up, you guessed it, decontaminate again.
5. Machine Settings Matter, But Comfort Wins
I could talk for hours about settings (and do in the video), but here’s the short version:
-
Amperage: Slightly higher than needed; use your pedal to control real-time flow
-
Balance: Crucial for aluminum. Too much cleaning and your tungsten dies. Too little, and you lose puddle clarity
-
Tungsten prep: I used a slight taper with a tiny ball on the end—great for arc focus
But honestly? All those settings mean nothing if you’re not set up to weld comfortably.
I adjusted my body position for every pass: resting wrists, supporting elbows, and welding in short bursts to stay consistent. Smooth welds come from controlled, repeatable motions—not muscling through weird angles.
Set yourself up for success before you strike your first arc.
6. Control the Heat (Or It’ll Control You)
Aluminum builds heat fast, and this shape had multiple tight seams right next to each other. That means distortion can creep in real fast if you’re not careful.
Here’s how I managed it:
-
Weld each pass one at a time
-
Let the part cool between passes
-
Use compressed air to cool it, I used a leaf blower between welds (seriously—it works FAST)
When you control heat, you control everything else: bead shape, color, cleaning action, and final alignment.
This was the final test of the whole project—balancing looks, strength, and straightness while keeping things cool.
Want to Watch the Full Build?
This article gives you the big takeaways—but if you want to see exactly how I cut, prepped, and welded this whole thing start to finish, I walk you through it all in a recent YouTube episode.
👉 Click here to watch the full video
Whether you’re practicing in your garage or just looking for inspiration, it’s a fun build that’ll stretch your skills and keep your brain in the game.
Catch you in the shop!
Dusty
Download your exclusive Beginner's Guide to Aluminum TIG Welding!
Enter your information below to receive exclusive PDF mini-textbook straight to your email.
We hate SPAM. We will never sell your information, for any reason.
