
How I Stop a Wandering TIG Arc on Aluminum
TIG Arc Deflection on Aluminum: How I Stop a Wandering Arc
Ever strike an arc on thin aluminum and watch it skate off the joint? I see that happen most on light material, and it can wreck a weld fast.
On 1/16-inch aluminum, a bad arc doesn't give much warning. It flickers, jumps, overheats the joint, and sometimes blows the filler tip apart. When I fix a few small setup details, the arc settles down and tracks where I want it. That's where I start.
When the arc starts dancing on thin aluminum
I notice arc deflection first on thin aluminum, especially when I'm pulse welding without filler. In that kind of pass, the tungsten and the arc have to do almost all the work. If the arc flickers side to side, I lose heat control right away.
That wandering arc shows up in two places. Sometimes it happens the moment I arc on. Other times it starts during travel, and the arc quits locking onto the joint. On thin material, that can blow the joint wide open before I have time to recover.
I've also seen the arc deflect toward the filler rod. When that happens, the filler tip can start burning off instead of feeding cleanly into the puddle. That's one of the fastest ways to turn a clean weld into a mess. If you want a quick visual of the problem, this Arc Deflection Example shows the same side-to-side behavior.
This is the short list I run through when an arc won't stay put:
| If I see this | I check this first |
|---|---|
| Arc flickers side to side | Tungsten grind and tip shape |
| Arc jumps to the filler | Pedal start and arc focus |
| Filler tip blows off | Heat input and deflection |
| Arc wanders near the end | Standoff distance |
On thin aluminum, small errors get loud fast. Because of that, I don't treat a wandering arc as one mystery problem. I break it into a few setup checks and fix them one by one.
My tungsten prep decides where the arc wants to go
Why I use a tiny ball at the tip
This part will go against what some TIG welders like to see. I don't prep my tungsten to a dead-sharp point for this kind of aluminum work. I leave a tiny ball on the end, and I keep that ball smaller than the diameter of the tungsten itself.
What matters most is the taper behind it. I grind a clean, even taper, then leave that small rounded tip in place. A lot of people prefer a full point or a blunted end. I get better stability from the small ball, especially when I have many starts on the same job.
That tiny ball helps the tip hold its shape. If the end of the tungsten starts to flutter or go misshapen after several starts, I read that as a sign that something is off, often the balance setting on the machine. With a small ball, the tip stays more consistent, and I still get the pinpoint arc I want.
How I grind it so the arc stays straight
The grind direction matters as much as the tip shape. I always grind lengthwise, in the same direction as the tungsten.
Grind lengthwise, no exceptions.
I stay away from radial grinding, diagonal scratches, and spiral marks. Those patterns can push the arc around because the surface of the tungsten isn't guiding it cleanly. Even with good machine settings, bad grinding can make the arc act wild.
Grit matters too. I use the finest grit I can for tungsten prep. A coarse wheel can leave deep grooves in the electrode, and those grooves show up the moment I flash up. The arc loses focus, and then I spend the rest of the weld chasing it.
Gas flow can help the arc settle, or shove it off target
I change gas flow when the job changes
Too much gas can push the arc around. I see that a lot on thin material and when I'm welding around round shapes. If the gas is too high, the arc can feel like it's getting blown off target even when the tungsten looks good.
Because of that, I never treat gas flow as set-it-and-forget-it. If I move from thicker aluminum to thinner aluminum, I often dial the gas back a little. I also match that choice to the cup size on the torch.
For aluminum, I usually like a number 5 or number 6 cup. That gives me a solid starting point, then I tune from there. If you're sorting out your torch setup, my Favorite TIG Welding Cups are worth a look, and the code Pacific15 can be used for a discount.
A quick practice pass helps me find the sweet spot before I touch the real part. That small test can save a lot of cleanup.
I protect the weld zone from moving air
Shop air can ruin a good gas setup. A breeze, a fan, or someone moving air through the work area can break up shielding and make the arc wander.
I like flash screens around the welding space for that reason. They help block stray air and keep the weld zone calm. Good ventilation still matters, but I keep fans from blowing straight at the torch or the joint. When the argon stays where it belongs, the arc behaves better.
The pedal and torch distance finish the job
I start slow so the arc can lock on
One of the most common mistakes I see is a hard pedal start. A lot of people stamp the pedal and try to force the weld to begin. That can send the arc shooting off to one side right away.
I feather the pedal down slowly until the arc starts. Once it locks on, I add more heat. That small change makes starts cleaner and it cuts down on contamination.
I feather the pedal on, let the arc lock in, then add heat.
A hard start can also throw small bits of tungsten. That's called arc spit. When that happens, the weld can get contaminated on the spot. I use the same soft touch at the end of the weld too. I feather off slowly instead of dropping the arc out hard.
I keep the same standoff distance from start to finish
The gap between the tungsten and the work has to stay steady. I keep that standoff distance close, and I try not to let it drift as I move.
A lot of arc trouble shows up near the end of a pass because the torch starts creeping away from the joint. Then the arc gets wider, weaker, and less predictable. Even with good gas, good settings, and clean tungsten, that extra distance can make the arc flicker again.
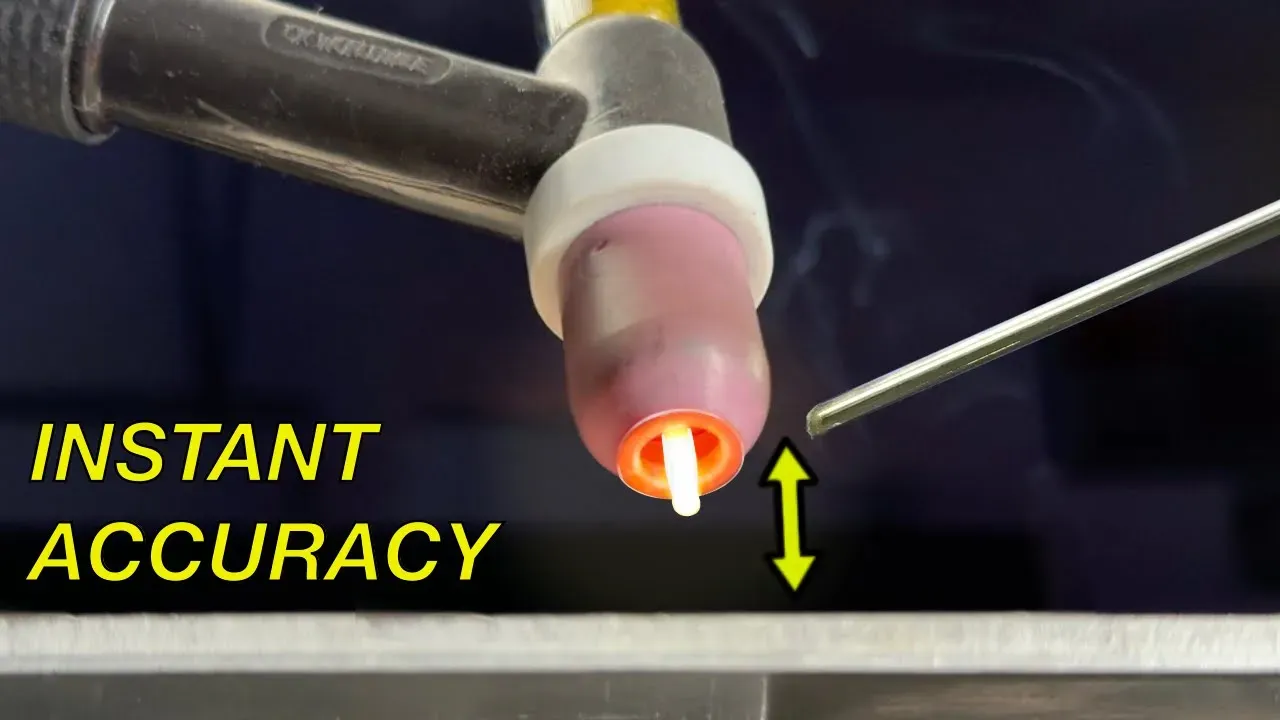
On a pulse weld without filler, torch accuracy is everything. When I keep the tungsten close and consistent, the bead looks steady from start to finish, and the back side shows good penetration too. The heat stays focused because the arc never loses the joint.
What I look for after dozens of starts
After a job with many restarts, I check the tungsten. I want the tip to look the same after dozens of flash-ups as it did at the start. If that shape holds, I know the prep is right, the torch setup is solid, and the gas is shielding well.
The only obvious exception is contamination. If I dip the tungsten into the puddle, all bets are off, and I regrind it.
If you want the step-by-step version of this setup, I put it in my Free TIG Welding Workbook. I also offer a Hardcover TIG Welding Textbook for anyone who wants a deeper reference at the bench.
Small changes, cleaner arc
A wandering TIG arc usually comes back to a few small habits, not one giant fix. When I clean up the tungsten prep, tune the gas, ease into the pedal, and hold my standoff distance, the arc settles down fast.
That matters most on thin aluminum, where every mistake shows up at once. Arc control starts before the puddle does.
I still come back to the same reminder: do a random act of kindness for a stranger today. Fill and chill, we'll talk soon.
Dusty
Download your exclusive Beginner's Guide to Aluminum TIG Welding!
Enter your information below to receive exclusive PDF mini-textbook straight to your email.
We hate SPAM. We will never sell your information, for any reason.
