
Aluminium TIG Welding Tips
Aluminium is one of the most rewarding but also one of the most difficult materials to TIG weld. Beginners often find that their welds come out inconsistent, sunken or burned though, or even cracked, no matter how hard they try. The real control and consistency often comes down to an understanding of how to balance the heat input, filler material, and gas coverage. In this article, we’ll walk through the common problems beginners face with aluminium TIG welding and the simple adjustments that lead to dramatic improvements.
Heat Input vs Filler Balance
One of the biggest factors in TIG welding aluminium is balancing heat input with the amount of filler material. Too much heat with too little filler, and your welds collapse and look sunken or concave. Too little heat or too much filler, and you end up with “grumpy” welds where the filler just sits on the surface without proper fusion.
The goal is to keep these two variables in balance. When they match, the weld puddle flows smoothly, edges blend into the base material, and cleaning action looks smooth and consistent. If your welds start good but fall apart near the end, chances are these two variable have fallen out of balance. Adjust travel speed, filler addition, or amperage control to keep that balance consistent. Keep this balance in mind!
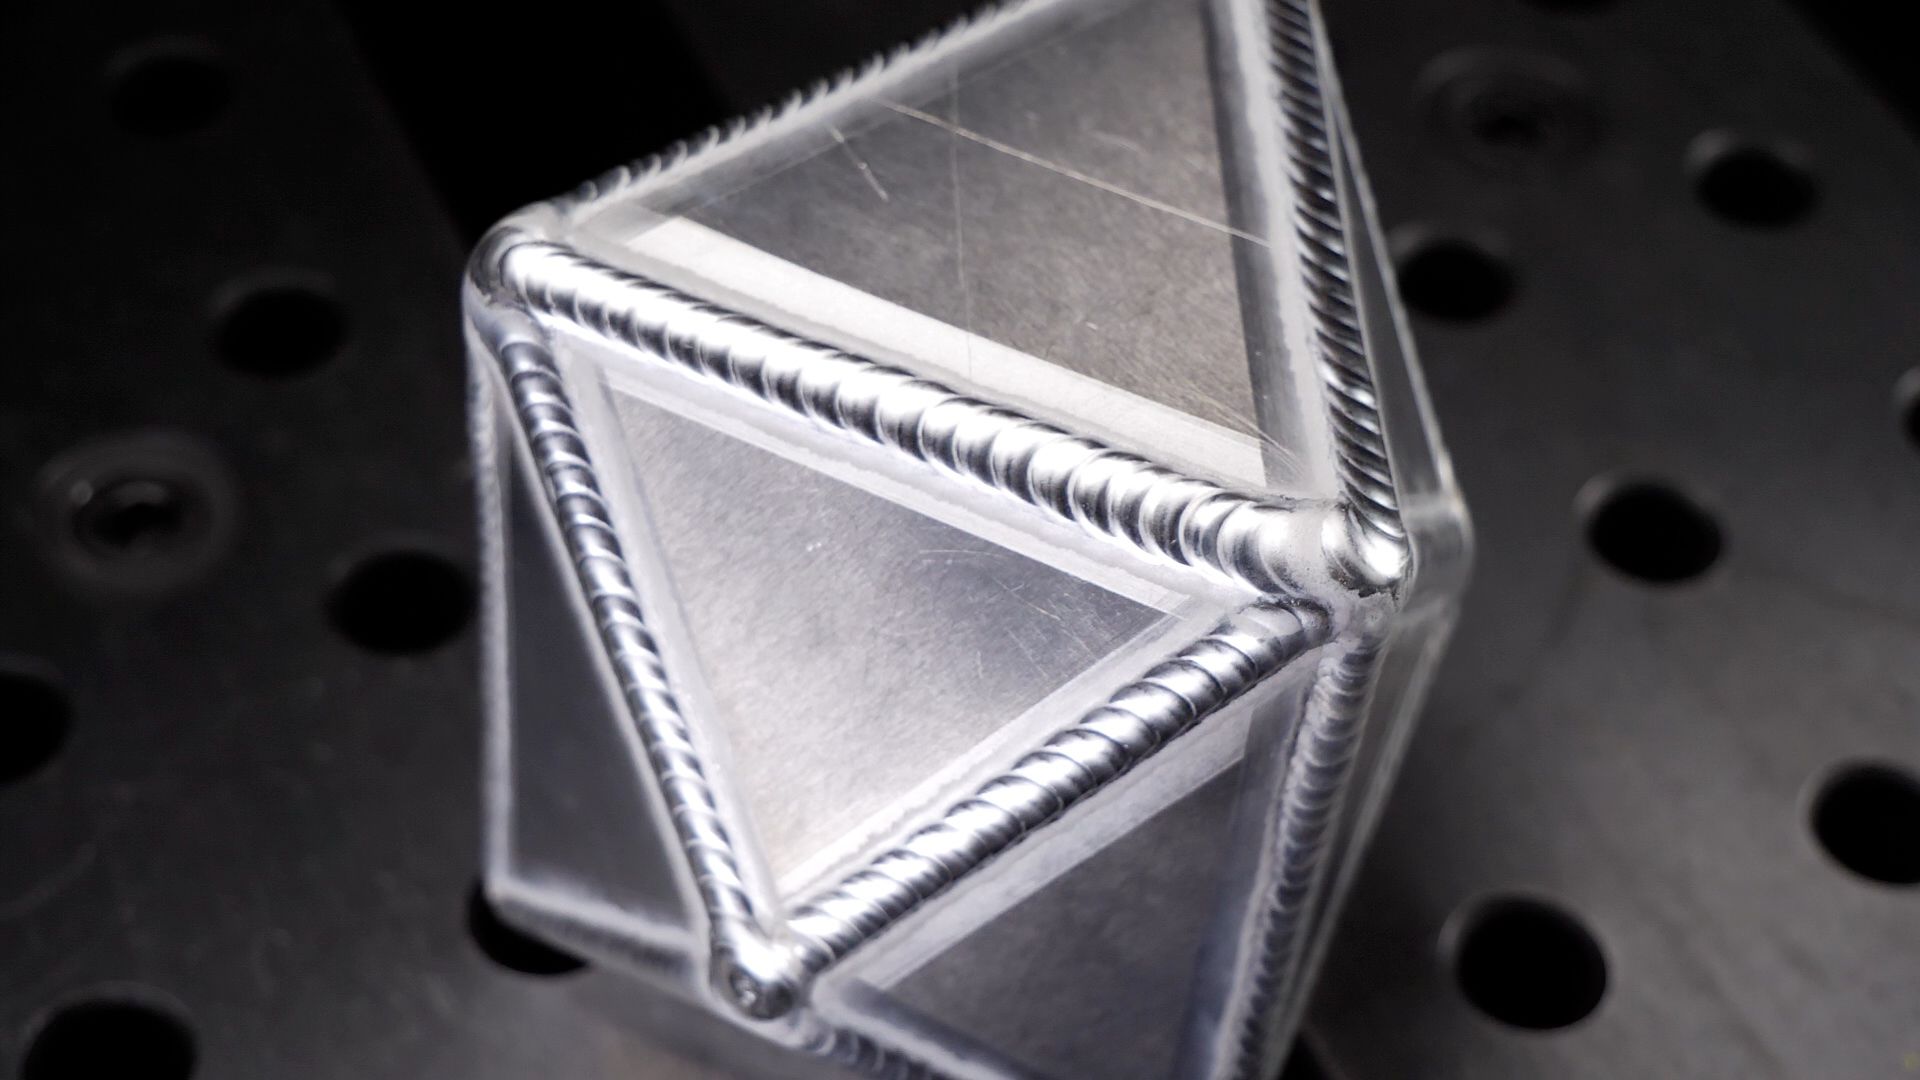
Stepping Distance and Consistency
Another major issue is stepping distance — the space between each filler addition in your weld. Beginners often space steps too far apart, which makes the edges wavy and exposes the centre of each puddle. This can create crater cracks and ruin weld strength, and just make things more inconsistent and tougher to learn overall.
Tightening your stepping distance makes welds look far more consistent and robotic. The line on the edges straightens, the puddle centres are properly covered, and the risk of cracks goes down. If you tighten your stepping distance, remember to consider the amount of filler material for each step to avoid overfilling. This small change often produces immediate improvements in bead appearance.
Gas Coverage for Shiny Welds
If you’ve ever wondered why some aluminium TIG welds look shiny and clean while others look dull, after carefully balancing the two variables we just talked about, the extra mile often comes down to gas volume and cup size. Adjusting your gas flow, paired with the right cup and gas lens, can transform the look of your welds.
For smaller cups and diffuser setups, a lower gas volume works well. For larger cups and gas lens setups, a slightly higher flow rate produces better coverage. Increasing gas flow just a little can improve cleaning action and give you shinier welds — but too much gas creates turbulence, especially around corners or pipe, which leads to erratic cleaning. The trick is to find the sweet spot for your setup.
Common Beginner Mistakes
Here are a few common TIG aluminium welding mistakes and what they cause:
-
Pulling the torch back too far → Arc loses focus, puddle becomes unstable.
-
Excessive filler use → Lumpy, uneven welds with poor fusion.
-
Rushing travel speed → Wide, inconsistent beads with weak penetration.
-
Poor fit-up → Gaps and weak joints that even good technique can’t fix.
Every weld tells you a story. Look at the bead shape, edge blending, and penetration to diagnose which variable fell out of balance.
How to Improve Quickly
To improve your aluminium TIG welding results fast, focus on these three fundamentals:
-
Balance heat input with filler addition.
-
Tighten stepping distance for consistency.
-
Dial in gas coverage for shinier welds.
When you apply these principles, your welds instantly look cleaner, stronger, and more professional. You’ll avoid common problems like porosity, lack of fusion, and cracking, and you’ll gain confidence welding both thin sheet aluminium and thicker plate.
Final Thoughts
TIG welding aluminium isn’t about guessing — it’s about balance. By paying attention to heat, filler, stepping distance, and gas coverage, you’ll see your welds transform from rough and inconsistent to smooth and shiny.
Want to see these techniques in action? I break them all down step by step in this video lesson. Watching the arc and weld pool up close will help you understand how to apply these tips in your own shop.
Download your exclusive Beginner's Guide to Aluminum TIG Welding!
Enter your information below to receive exclusive PDF mini-textbook straight to your email.
We hate SPAM. We will never sell your information, for any reason.
