Fix Your Ugly Stainless TIG Welds — For Real This Time
From Frumpy to Fantastic: Fixing Ugly Stainless Welds
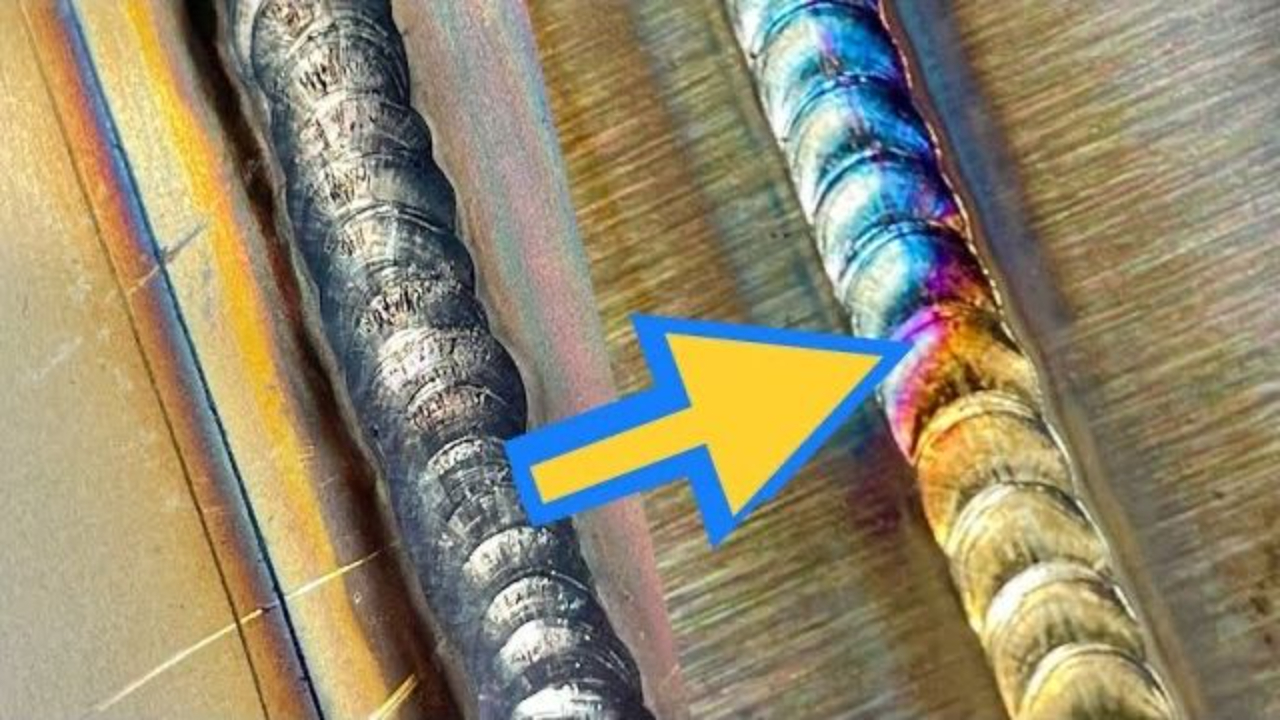
Ever laid down a stainless weld that made you want to turn the lights off and pretend it didn’t happen? We’ve all laid down stinkers before, I can relate. But did you know that you can actually FIX them?
More often than not, the problem isn’t your machine, gas, or gear. It’s heat. Plain and simple.
It’s Overheated.
That ugly gray discolouration you’re seeing? That’s your weld telling you it’s had enough.
When you pump too much heat into stainless, you can have the best settings, the best cup for perfect gas delivery, and it can still turn out to have these problems:
-
Over-oxidation – that crusty gray, dull looking mess
-
A massive heat-affected zone – this can actually weaken your base material
-
Bulky, hard-to-control passes – yikes. Wobbly puddle, filler not settling as it should: Very frustrating.
Want the fix? Two words: Fill and Chill. Feed that filler rod early and keep your heat in check. That’s the game. A couple extra dabs of filler material will help to soak up some of that heat, and this is EXTREMELY important to do at the start of your weld.
Before the Fix: Gear Check
Need gear? Check out:
The Fix: Rescuing Overheated Fillet Welds
Got a fillet that’s gotten out of control? Here’s how I bring it back:
Step 1: Clean it up.
Use a stainless wire brush or a gentle wire wheel. Don’t dig in—just hit the surface hard enough to remove that gross, dull oxide.
Step 2: Do a "Show Pass."
Lay a light, straight bead over the mess.
Use only a little filler this time, keep your heat input in check, and keep that gas coverage on point.
Step 3: Weave it wide.
If it’s really spread out, go with a light weave pattern. It lets you reshape the weld without adding a ton of heat. Just watch the toes of the weld to make sure the edges of the weld form a straight line, not a pass where the edges go in and out. Scribe a guide line to follow first, this will help you hit that straight edge each step forward you take.
Cold Outside Corners? Use Pulse or “Foot Pumps”
If you're dealing with an outside corner that just won’t flow—and more filler just makes it bulky—switch tactics.
Pulse It.
Use your machine’s pulsing feature or tap the foot pedal manually as you step forward. Get a nice rhythm going. This gives you control without filler.
-
Clean first
-
Start strong
-
Keep the torch steady
-
Use post-flow to avoid contamination
The Rule of Heat: Watch for These Mistakes
Overheating shows up as:
-
Gray/dull welds
-
Wide, ugly HAZ
-
Sunken or hollow passes
The fix?
-
Add filler earlier to soak up heat
-
Keep your speed up
- Mitigate and carefully monitor heat input
-
Use pulsing for control
Want to See It in Action?
I break this whole process down in a video lesson here:
👉 Watch How to Fix Bad TIG Welds
You’ll see how I reshape a fillet, dial in the weave, and keep heat in check—all in real time.
Ready to Go Deeper?
If you're serious about getting better, don’t stop here.
My free online TIG classes walk you through aluminum and stainless welding—step by step. They're packed with value, and yep, they’re free.
I built these programs to take the guesswork out of TIG welding. Whether you're learning from scratch or sharpening your skills, there’s a ton inside to help you move faster.
You don’t need a perfect machine or fancy gear—just good habits, simple tricks, and practice that actually teaches you something.
Now go clean up that weld, do a random act of kindness for someone, and get welding.
Dusty James
Fill and chill. Talk soon. Peace.
Download your exclusive Beginner's Guide to Aluminum TIG Welding!
Enter your information below to receive exclusive PDF mini-textbook straight to your email.
We hate SPAM. We will never sell your information, for any reason.

