
Aluminum TIG Welding: Let’s Make It Easy
Aluminum TIG Welding can feel intimidating—it melts fast, the oxide layer fights you, and everything heats up quick. But once you understand the process and prep it right, it becomes way easier than most people think.
Let’s walk through it together!
First up: Clean everything
If it’s not clean, it’s not gonna weld right. Wipe down your base metal with acetone. Then hit it with a dedicated stainless wire brush—brush in the direction you’re gonna weld- (Lengthwise to the welding direction, never Criss Cross Applesauce.) Clean your filler rod too (yes, even brand new rod). Trust me, this step matters.
Oh—and check your plate for plastic film. I once welded with the film still on… in front of 50 students. Don’t be that guy.
Material & Filler
I’m using 1/8” 5000 series aluminum base material—it’s forgiving and welds REALLY clean. Filler? Go with 5356 if you’re new. It’s more stable and gives great feedback. 4043 works too, but it flows a bit different, and can sometimes be tricky to get good feedback on your work. Even for myself these days 5356 is still my go-to.
Safety gear? Non-negotiable.
Good gloves, solid eye protection, proper ventilation. And keep acetone rags far away from sparks—don’t blow yourself up trying to clean a weld.
Machine setup (using AC):
This would be the settings and setup I would use for a lap joint, or butt joint setup.
-
Amps: ~140
-
Balance: 70% EN, 30% cleaning
-
Frequency: 100 Hz
-
Post-flow: 9 sec
-
Gas: 100% Argon at 17 CFH
-
Foot pedal for control
Torch setup? I use a 2.4mm (3/32") gas lens, wedge collet, and #6 cup. If you wanna have good control and keep a prep that works well with most settings and machines, ball your tungsten small—smaller than the tungsten itself. (See the attached video lesson below for a demonstration of this!)
Fit-up and tacking
Get the plates clamped, brushed, and aligned. This is really important for a lap joint and a butt joint configuration. I use a two-step tack for better puddle control and to test my settings. Again, the video lesson attached below is a must to watch a demonstration of this.)
Scribe a guide line for consistent width. It keeps things clean and lets you track your weld visually.
Welding the pass
Let the start establish. Add filler slow and steady. Stay on your scribed reference line and back off the heat toward the end. Hold your torch in place for post-flow—don’t move it.
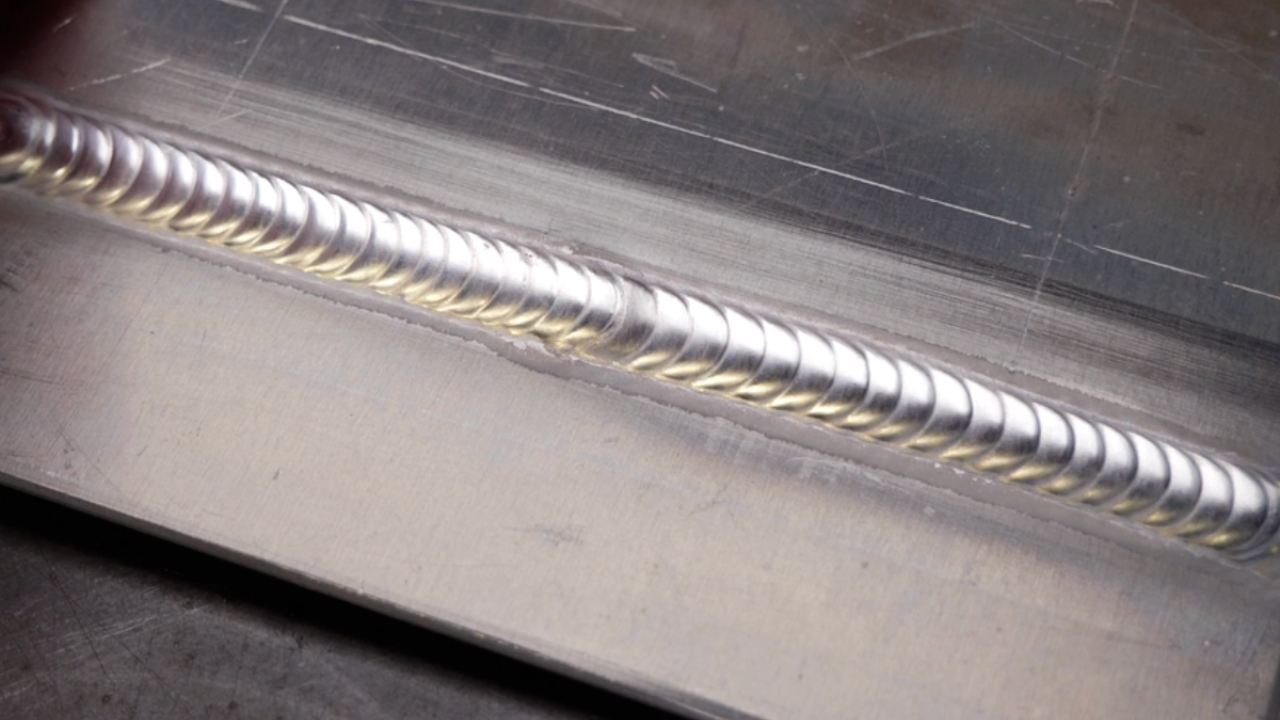
Final weld check
Look for:
-
Clean, consistent cleaning action
-
Consistent profile
-
Tight stepping distance
-
A straight line to the edges (toes) of the weld on each side of the pass.
Watch the Full Lesson HERE!
👉 GO WATCH NOW!
Want the Downloadable Tig Welding Workbook?
👉 Download The Free Aluminum TIG Workbook Here
Let’s weld.
– Dusty
Download your exclusive Beginner's Guide to Aluminum TIG Welding!
Enter your information below to receive exclusive PDF mini-textbook straight to your email.
We hate SPAM. We will never sell your information, for any reason.
